


Security of Node.js applications has been very important since it is becoming a widely used platform for developing web applications/web services and many other applications. With the backend of JavaScript, Node.js has brought the security risks of JavaScript applications to the server-side. With the asynchronous nature of Node.js, most of the traditional mechanisms for web application protection cannot be directly applied in Node.js applications. In this post, I will discuss what I have researched and experienced in writing secure Node.js web applications and also some of the best practices.
Prevent XSS! Context-Based Encoding
Cross-Site Scripting (XSS) is one of the most common but ignored types of attacks. Since Node.js is implemented with JavaScript, there is a high-risk of developers introducing XSS vulnerabilities in the code. Output encoding is one of the best ways to prevent XSS attacks. Most view engines such as Jade provides built-in encoding mechanisms. But the most important thing is that you should use appropriate encoding to based on the context. The following are some situations that you should use a context-specific encoding.
- URL encode parameters that are appended as url parameters. URL encoding can be done using encodeURI() and encodeURIComponent() javascript built-in methods.
- HTML encode parameters which are displayed in HTML. HTML encoding is provided by view engines such as jade as well as frontend frameworks like Angularjs. You also can explicitly do it from server side using htmlencode npm module.
- CSS encode parameters which are used in element styles
Prevent CSRF (Cross Site Request Forgery) with Anti-Forgery Tokens
Cross-Site Request Forgery (CSRF) allows an attacker to execute a certain function on the web application on behalf of yourself. To prevent these kinds of attacks, we can implement Anti-CSRF tokens so that the server can validate whether the request is coming from the intended sender. Anti-CSRF tokens are one time tokens which are sent along with the user’s request and used by the server to validate the authenticity of the request. Please refer to my previous blog post about what Anti-CSRF tokens are.
Express.js framework is a web framework for Node.js which has in-built support for CSRF prevention. Following example shows how to initialize CSRF protection with Express.js and Node.js. When this protection is added, express.js creates a secure token which is sent to the server via both request body and cookies. These two tokens are validated by the server for forgery. If the server fails to validate these two tokens, the server returns a 403 Forbidden response to the client.
This mechanism prevents an attacker from sending requests to the server on behalf of yourself since the attacker has no access to the cookie for the domain in your browser. Even if he collects one token, he cannot replay it again since the token is one time.
Above generated CSRF token then should be placed in your view as follows so that it gets submitted when the user submits the form.
If you are using angular.js with express.js and node.js, you will need to do some changes in your code to make express CSRF protection mechanism work with angular.js. Angular.js has built-in support for CSRF protection as they have mentioned in their documentation.
When performing XHR requests, the $http service reads a token from a cookie (by default, XSRF-TOKEN) and sets it as an HTTP header (X-XSRF-TOKEN). Since only JavaScript that runs on your domain could read the cookie, your server can be assured that the XHR came from JavaScript running on your domain. The header will not be set for cross-domain requests.
For angular.js to send the CSRF token we create with express.js, we need to manually set the value of CSRF token as a cookie named ‘XSRF-TOKEN’. This can be done by a simple middleware as follows.
Then angular.js $http service will pick this value from the cookie and will send with the subsequent request to the server. When the request completes, express.js will generate a new CSRF token and send it along with the response in Set-Cookie header which can be used for the next request.
Secure Express.js Sessions and Cookies
Session cookie name reveals your application’s internals
Revealing what technologies you are using for your application is one of the key things that you should not do. If an attacker knows what kind of technology you are using, he can drastically reduce his scope in finding vulnerable components in your application. There are a couple of ways that reveal internal implementation details of your application. One of them is the session cookie name of your application.
Let’s look at the session cookie set by my application.
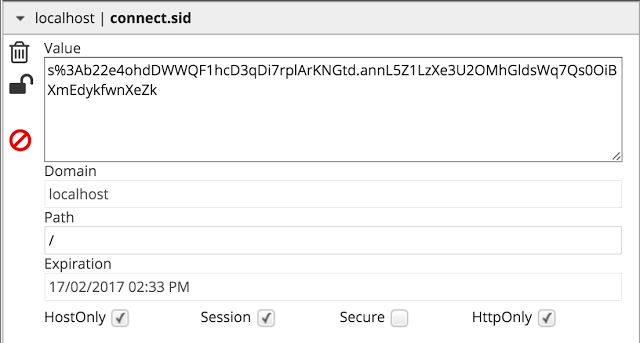
We can see that the session cookie name is connect.sid. This is the default cookie name set by the express framework for your application. Anyone who sees this cookie can immediately identify this is a Node.js application unless the developer of the application has masqueraded the cookie name. So how can we change this so that nobody can identify our application is node.js based? It’s no big deal. Have a look at the following code snippet which initializes an express.js session.
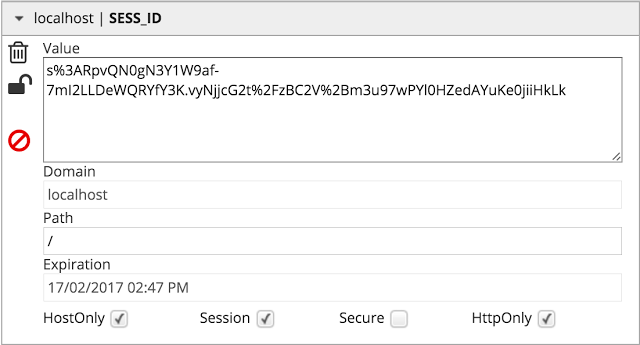
You can see that I have specified the name SESS_ID as the name. Express.js will then take this name as the name for the session cookie. Once you do the change, clear all cookies and restart your application you will see the session cookie name is now changed to SESS_ID as follows:
In the previous code snippet, you can also see there is a secret specified in the options object. This secret is used to sign the session id value to prevent attackers from injecting malformed session cookies and hijack sessions. Although this does not 100% guarantee that attackers cannot forge a session id, providing a hard-to-guess secret facilitates good protection from session hijacking.
Make cookies more secure
When you use cookies in your application make sure to add HttpOnly flag to the cookies. Adding HttpOnly flag makes sure that no external script other than an HTTP connection can fetch cookies in your application. This is a good protection mechanism against cross-site scripting attacks where attackers read your cookies through malicious scripts.
And also, if your application supports HTTPS (you should!) make sure to add Secure flag as well to prevent a cookie from being transmitted through insecure HTTP connections so that any man-in-the-middle attack can compromise your cookies. Imagine a scenario where your application is served via HTTPS, but you do not use secure cookies. Although you use HTTPS, there might be some static content (such as images) that are still being loaded through an HTTP connection. An attacker might be able to intercept this kind of a static content response and grab the cookie which is never supposed to be revealed. In this kind of scenario, even if you think your cookies are safe, it’s not.
Consider the previous example where we initialize the express session. We can make the session cookie Secure and HttpOnly by setting these options in a cookie object as follows:
cookie: { secure: true, httpOnly: true }
When you are creating any other cookies later in the application, you can specify them to be secure and HTTP only as well.
Signing cookies
Signing cookies provide prevention of cookie forging. A signed cookie is a value that has the cookie value as well as a digital signature attached to itself. Once the cookie is received from the server end, the server will validate the integrity of the cookie by validating its signature. Cookie signing is provided with express.js [cookie-parser](https://www.npmjs.com/package/cookie-parser) middleware. Take a look at the following example,
Cookie parser middleware accepts a secret string as a parameter that is used to sign the cookies. To create a signed cookie as above, you need to specify signed: true in the cookie options as the example illustrates. You can access these signed cookies with res.signedCookies object. If the signature of the cookie is valid, this object will contain the real value of the cookie with the matching key as the cookie name. Like the above example, if the user has modified the cookie value, currentUser will have no value as if such a cookie never existed. Make sure you specify a difficult to guess secret as the in the cookie parser which makes brute forcer’s life harder.
Error Handling
Proper error handling is not as trivial as one might think. With Node.js, it’s even weirder. Node.js has multiple ways of error handling which depend on whether the function is synchronous or asynchronous. Yes, you can use the almighty try…catch in Node.js, but if you use it wrapping some asynchronous code which accepts a callback, you are done. Asynchronous pieces of your code will not work with try…catch error handling mechanism. Since an asynchronous function is not blocked, execution will continue to the next line and will jump out of the try…catch block without any incident even if an error occurs when the function gets executed. The following example shows where try…catch block should be used inside a node.js application.
However, if you are using async-await, you can still use try…catch to handle errors since async-await mimics asynchronous code execution even though it’s still asynchronous.
Errors while calling asynchronous functions should be handled using callbacks unless you use promises or async-await. You should design your asynchronous functions in order to accept a callback function as a parameter that can be used to handle any errors occurred during execution. The following example demonstrates how error handling should be done with asynchronous functions.
Know how your code behaves, and use proper error handling based on how it behaves.
Protect Database Access
If you are using a data store such as Mongo DB as your persistent storage, you also need to protect access to the database as well as prevent database being compromised by attackers. If you are using MongoDB as your database, the following things should be considered as important.
Enable client authentication in MongoDB to prevent the situation “Everyone is admin”.
By default, MongoDB does not enforce authentication to access databases. This is really harmful since anybody has direct access to the database content even if they do not have access to use your application. So you need to implement client authentication in MongoDB and prevent malicious access to the data.
Sanitize user inputs used in MongoDB queries
MongoDB query language is a javascript based technique. Due to this nature, MongoDB is also vulnerable to script injection attacks. When you use user-supplied input values inside mongo DB queries you should properly enforce type checks and necessary input validations and sanitizations to prevent attackers from executing malicious scripts on your database.
Look at the following vulnerable code which reads the username from the request body and reads his secret notes from the database.
This can be exploited to view the secret notes of other users as well if you do not place proper validations. A request with the following request body will make the above code to read other users secret notes as well.
{
    "secret": {
        "$gt": ""
    },
    "username": {
        "$gt": ""
    }
}
This request body will change above query to the following which will return all user secret notes:
DBSecretNotes.find({username: {"$gt": ""}, secret: {"$gt":""}})
Therefore, you should never trust user input and it should never be placed directly inside the database query without proper validation.
Cross-Origin Resource Sharing
If your node.js application is supposed to serve resources to external websites/applications (such as google fonts etc.) you might need to support cross origin resource sharing (CORS). Cross-Origin requests are by default blocked by browsers to prevent external script injections and expose applications to unnecessary threats. But if you need certain components of your applications to be accessed by other websites always make sure you expose what you really need to expose and no others. And also if you want to allow accessing your resources by certain external applications only, you should whitelist those applications and should block all other external requests. Using CORS in your node.js applications can be done flexibly and safely by the [cors](https://www.npmjs.com/package/cors) npm module.
Allowing CORS can be done by browser headers which instruct the browser to allow specified components of your applications to be accessed by external applications. When your application is configured for CORS, your application can provide the following headers which instruct browser which requests should be allowed.

When the external application accesses resources in your application, they need to send appropriate headers saying which type of a cross-origin request it is sending. Based on the CORS configuration on the server, the external application will either be served or rejected.
Preventing HTTP Parameter Pollution (HPP)
HTTP parameter pollution is a web application attack that is aimed at bypassing server-side URL parameter validations and attack a web application. Imagine you have written a node.js application that exposes the below URL which has URL parameters firstname and lastname.
http://example.com/?firstname='Jack'&lastname='Sparrow'
An attacker would try to attack the application by modifying the URL to the following.
http://example.com/?firstname='Jack'&lastname='Sparrow'&firstname='Jill'
In this case, the attacker provides two firstname parameters instead of one. This is a basic example of how HTTP Parameter Pollution (HPP) can be performed. In express.js above URL will be parsed from the server and firstname and lastname query parameters will be as follows:
req.query.firstname = ['Jack', 'Jill']
req.query.lastname = 'Sparrow'
Although you intended to accept a string as the firstname, it has become an array containing two values. This scenario might cause multiple problems.
- Causing type errors in your application
- Unexpected database query execution
- Modify your application logic
- Bypass through validations
and many more. To prevent this kind of attack, you should properly implement type checking on query parameter values, identify potential HPP attacks and act accordingly. You also can use hpp npm module to protect the application from HPP attacks as illustrated in the following example.
The above code will log the following output in the console.
Query Parameters : {"firstname":"Jill","lastname":"Sparrow"}
Polluted Query Parameters : {"firstname":["Jack","Jill"]}
As above, hpp middleware will detect an HPP attack and will move the attacked parameters to a new object called req.queryPolluted. And it will update the req.query.firstname by the last value of the firstname array preventing an HPP attack.
Server Headers
Disable X-Powered-By Header
X-Powered-By header reveals unnecessary details about your application’s internal implementation. Looking at the value of this header, an attacker could map your application’s internal structure and plan more organized attacks. By default, all express.js web applications set this security header the value ‘Express’.
This information is very valuable because an attacker can identify that your applications run on node.js and he can also attack your application or server if you are running an outdated node.js version. This is an unnecessary risk. By removing this header or by masking its value by something else will keep any adversaries off a little bit.
In Node.js with Express.js, you can remove this header by adding the following line to the code after you initializing your express app.
app.disable('x-powered-by');
Setting Security Response Headers
HTTP Server security headers provide a vital role in securing a web application. These headers can enforce browser built-in security features to protect your web application from client-side attacks. In a previous post, I have discussed these headers and how they protect web applications. Few important server security headers are:
- X-Frame-Options — Prevents your application being displayed in iframes
- X-XSS-Protection — Invokes browser XSS protection mechanisms
- X-Content-Type-Options — Prevents mime sniffing
Setting these security headers in your application can be done easily by writing your own express middleware which sets these headers.
And also you can use helmet npm module to add these security headers, remove/modify x-powered-by header and many more security features to your application.
Other Best Practices
No eval() please
If eval is a new term to you, eval is a method in javascript where you can evaluate a given expression in string format. This method has great power which comes with great responsibility. Following is a basic usage of eval.
You will see the string supplied to eval() method will be evaluated and variable number1 will be initialized with value 100. Although it is not declared anywhere else in the code, it can be used in the rest of the code.
Also, have a look at the following script I ran on REPL.
This nature of eval() function introduces a big risk when you use user inputs inside the eval() function. If you do not encode/sanitize user input before using it inside eval() function, an attacker has the capability of executing an arbitrary code on your server which can be very dangerous. Therefore, eval() function should not be used unless it is very necessary and there is no alternative other than eval(), as well as you know what you are doing.
require() in the top of module scope
require() is a call that can be used anywhere in the code to import other node.js modules. This call is a 'synchronous' file inclusion method that blocks the rest of the code until it returns. Therefore it is recommended to use require() calls to include all necessary node modules on top of the file. This allows all modules to be loaded when the application starts and improves the performance of the application.
GET should not mutate state
Do not use the HTTP GET method to invoke functions that mutate your application’s state. GET requests always should only do a get. No matter how many times you send the GET request, your application’s state should not be modified. GET requests are logged in browser history and many more places and easy for an attacker to find and send through a browser. If you are doing some unsafe operations with the GET requests such as database updates, file writes, etc., you are doing it wrong.
May your code do not invite DOS and DDOS
Node.js is a single-threaded unless you are using worker threads. Therefore, performing CPU intensive operations can cause a denial of service attack on your application. You need to pay attention to several details to prevent being DOSed.
Validate the content length of the requests. This prevents your application from accepting large requests and taking time to process those requests. This can be achieved with express-content-length-validator npm module.
Limit the request flow into your application. This can prevent DOS and DDOS attacks on your application. Limiting request flow can be achieved by throttling requests to your application through a front-end proxy like nginx and limiting request flow through NGINX~ configuration, or you can use an npm module such as ratelimiter to do it in your application itself.
Carefully use regular expressions in your application. Certain regular expressions including repeating groups with repetition or alternation with overlapping inside the group can cause your application to take exponentially increasing time for certain non-matching inputs. Since regular expressions are evaluated in event loop thread, when a regular expression is being evaluated, the whole application gets blocked. Generally, evil regex types look like:
- (a+)+
- ([a-zA-Z]+)*
- (a|aa)+
- (a|a?)+
An evil regular expression can cause an exponential increase in time taken to evaluate it when certain inputs are provided. Look at the following example.
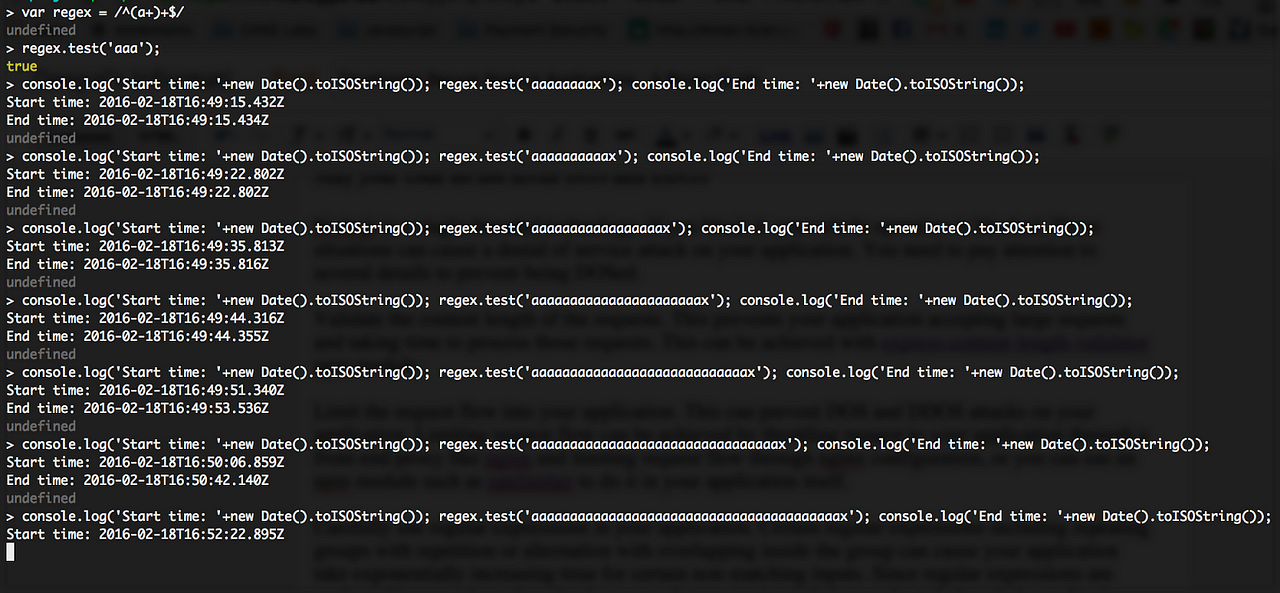
You can see the start time and the end time of the regex evaluation for each string. After executing the last line I waited 20 minutes to see the end time until finally, I decided to give up and close the terminal. Now you have a clear idea of what an evil regex can do to your application.
Following is a quote from OWASP explaining evil regex very well.
The Regular Expression naïve algorithm builds a Non-deterministic Finite Automaton (NFA), which is a finite state machine where for each pair of state and input symbol there may be several possible next states. Then the engine starts to make a transition until the end of the input. Since there may be several possible next states, a deterministic algorithm is used. This algorithm tries one by one all the possible paths (if needed) until a match is found (or all the paths are tried and fail). For example, the Regex
^(a+)+$is represented by the following NFA:
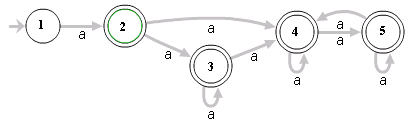
For the input aaaaX there are 16 possible paths in the above graph. But for
aaaaaaaaaaaaaaaaXthere are 65536 possible paths, and the number is double for each additional a. This is an extreme case where the naïve algorithm is problematic because it must pass on many many paths, and then fail.
Therefore, when you use regular expressions in your application, make sure they do not make your application freeze and also most importantly, never accept user-supplied input as a regex.
Stay Up to Date
No matter how many protection mechanisms you implement from your application level, if you have an outdated node.js version or outdated and vulnerable npm modules, your application is at risk. Outdated components might have already published vulnerabilities and even exploits to attack those components. Therefore, always keep your application components up-to-date. The following are a few tools that you can use to identify potential outdated components in your application.
And also keep your Node.js version and NPM up to date. Node.js version can be updated with “n” npm module.
sudo npm install n
sudo n stable
You can update npm using npm (weird right?)
sudo npm install -g npm
Use explicit package versions
When you install packages using npm install, you will see that there is a little “~” or “^” symbol in front of package version numbers.
These letters mean your packages will be updated to the latest versions (minor versions or major versions) when you do npm update. Even though this sounds cool, using drifting package versions could cause a lot of problems.
- Some package vendors might release unstable package releases that can break your application.
- Some major updates will change the behavior of the initial module you added to the project drastically hence breaking your existing code
- … and many more.
Therefore keep your package versions fixed by removing those characters so that you can expect the same behavior as you implemented from your application. You can enforce npm to include a fixed version in package.json by running npm install with some other parameters as follows:
npm install foobar --save --save-exact
Also, you can configure npm to always include a fixed version in your package.json when you do npm install. This can be done using the following commands in your terminal.
$ npm config set save=true
$ npm config set save-exact=true
These settings will be saved in ~/.npmrc file and will be applicable to all npm commands afterward.
No sensitive data inside your repo !!!
SORRY FOLKS!! I was wrong from the beginning. I put cookie secret and session secret in my code itself. What if I commit my code to GitHub? anybody who has access to the repo can see my secret keys. This is a bad practice. Although I put it in the code for demonstration purposes, never store secret strings in the code itself. It makes you change the source code when the keys change as well as it reveals sensitive information to 3rd parties.
The best practice is to store this sensitive information in environment variables and access those variables in your code using process.env.
Then you can run your application after you initializing your environment variables.
$ EXPRESS_SESSION_SECRET = 'evvMU3G*G#zdA459z7B/span>
$ EXPRESS_COOKIE_SECRET = 's8*H*6wvfHc7WN!*nun6'
$ node server.js
Use a linter tool
Use a Javascript lint tool such as JSlint or Eslint to maintain consistency in your code and maintain coding best practices throughout the code. Using these tools you can enforce secure coding practices for all developers in your project using custom rules.
Do not run node as ROOT !!!
Never run Node.js as root. Running node.js as root will make it worse if an attacker somehow gains control over your application. In this scenario, the attacker would also gain root privileges which could result in a catastrophe. If you need to run your application on port 80 or 443, you can do port forwarding using iptables or you can place a front-end proxy such as NGINX or apache which routes request from port 80 or 443 to your application.
There is another code-based solution where you can start your application as sudo, but as soon as the application starts listening on the port, the application de-escalates its privileges level to the normal user.
Useful NPM modules
Here I am listing the NPM modules which I have previously discussed which can be used to implement various security features in your application. And also I am listing some additional modules which you can use for testing and debugging as well.
- csurf — Implement Anti-CSRF tokens to prevent cross-site request forgery
- cors — Enable Cross origin resource sharing
- hpp — Protection from HTTP Parameter Pollution
- express-content-length-validator — Prevent DOS attacks
- rate-limiter — Prevent DOS attacks
- helmet — Set custom security headers
- nsp — Scan for deprecated/vulnerable npm modules used in your app
- retire — Scan for deprecated/vulnerable npm modules used in your app
- mocha, should, supertest — Writing node.js tests
- bunyan — Logging
I think these tips will be useful for you to develop secure Node.js applications. If you have any comments, feel free to write them below.
References
- https://devcenter.heroku.com/articles/node-best-practices#use-a-smart-npmrc
- https://docs.angularjs.org
- https://github.com/expressjs
- https://www.owasp.org/index.php/List_of_useful_HTTP_headers
- http://blog.websecurify.com/2014/08/hacking-nodejs-and-mongodb.html
- https://speakerdeck.com/ckarande/top-overlooked-security-threats-to-node-dot-js-web-applications
- https://www.owasp.org/index.php/Regular_expression_Denial_ofService-_ReDoS
- https://docs.mongodb.org/manual/tutorial/enable-authentication/
Background Image Courtesy : http://6iee.com/488395.html